

(Part 1 of a 2 part series)
As the hobby of researching and collecting axes of historic significance become flooded with counterfeit examples, I think it’s worth sharing why the current trend of using CNC (Computer Numerical Control) machines will never be a cost effective alternative to producing replicas of historically etched axes. Understanding the differences in this modern technology and the original methods of marking axes can also make identifying these newer, fraudulent axes quite simple.
1) Historic Methods:
Stamping
The first technique for marking historic axes to note is stamping. Stamping is achieved by pressing a formed stamp against the metal to leave an identifiable mark. This technique can be done while the metal is still heated from the forging process (hot stamping) or after it has cooled (cold stamping). If the metal is still hot, it is more malleable, which allows for a deeper, more consistent stamp that can be made with less force. Cold stamps tend to have less formed depth, more distortion, and require much more force to accomplish. In both the cold and hot stamping, no metal is removed from the head. The metal that was where the stamp now lives is simply compressed down or to the sides and out of the way. This is an important thing to understand when comparing it to other methods. The following picture shows a Collins Company stamp in which the displacement of the metal can clearly be seen. This pushed metal appears somewhat like a shadowing around main indentation, and due to inconsistencies in the metal, is not perfectly uniform or straight. Due to this need for displacement, stamps are typically used on smaller or thinner marks, rather than larger or broad imagery. To achieve repetitive consistent stamps, a manufacturer would use the same stamp until it wore down or became too deformed, after which it would be replaced. Though there was a cost to have the stamp itself produced, as it could be used for hundreds or even thousands of production units, the cost to replace it was minimal. (Please note: as the imagery is recessed, this is NOT “embossing”, it is technically “debossing”.)

Acid Etching
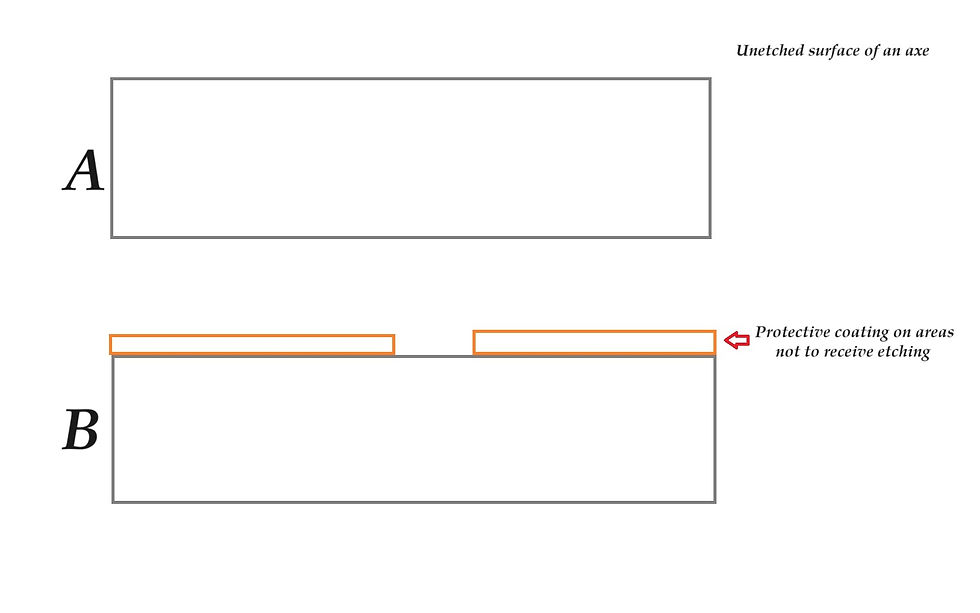
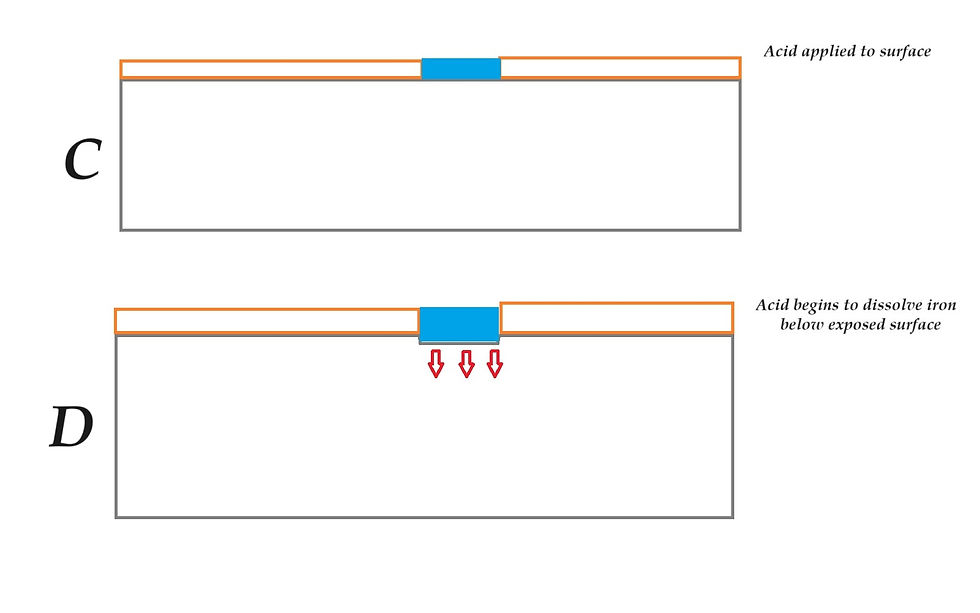
For larger images, acid etching was the primary marking technique for historic axe manufacturers. Acid etching was a much more involved and time consuming process, and increased the cost of production dramatically. Due to this fact, etched axes typically were only upper end models, and the cost to the consumer reflected this. In classic acid etching where axes are concerned, a sketched transfer paper pattern was lain on the axe head that would be receiving the etch. In most cases, the head would have been brought to a higher grade finish before the etch, leaving it in a top end condition before the acid treatment. This allowed for a more consistent etch, and would allow for minimal grinding or polishing after the etch, as doing so afterwards would have been much more difficult. Getting polishing or refinishing done in the recesses of the etch would be time consuming if even possible. With the transfer paper over the axe head as a pattern or stencil, a non-dissolvable substance such as a lacquer or wax would be placed onto the head, covering only the portions of the patterns that were to be raised (embossed). The areas to be recessed would be the areas left with no protective covering (the lacquer or wax). The face of the axe, where the image is to be etched, is then placed in a tray or bath of acid. An understanding of the way the acid effects the area of the etch is important in understanding the form of the image that will be left. As noted in figure D, the applied acid initially begins to effect the metal by dissolving it at the exposed site. However, as the acid works its way deeper, it finds the lateral edges of the cavity it is making exposed, and begins to work its way outward, as noted in figure E. As time passes, the metal is dissolved not only deeper, but wider as well. The longer the acid is applied, the wider the areas that have been exposed the longest become. This leaves parabolic edges to the concavity created. This is extremely important to note! When an area that has been protected from the acid bath is bordered by areas that have not bee protected, the axe is left with a true “embossed” section.


2) CNC/Laser
Acid etching’s time consumption, cost, and “one piece at a time” nature caused its dramatic decrease during the great depression. High end axes were a commodity that most consumers avoided, as at most they needed a cheap way to get a job done, and decorative costs were not at the forefront of most budgets. The War Production Board’s Limitation Orders, especially L-157, made production of such axes illegal through the end of the war. After 1946, the vast majority of manufacturers eliminated their etched lines, relying more heavily on stamps and paper labels, as both were more cost effective and less time consuming. After the 40s, 99.9 percent of manufactured axes relied on stamps and paper labels for identification and markings. However, in modern times, counterfeiters, looking for ways to simulate the look of acid etched axes, have taken to using CNC equipment and lasers to carve out etches on axes. Some of these axes are newer, whereas in some cases the counterfeiters use antique heads to make these illicit copies. Understanding how these more modern tools act on the metal of an axe head allows us to identify when they are used. What we know as CNC (Computer Numerical Control) Machines were initially invented by researchers at MIT in 1952, thought they were not advanced until around 1958 when the first design was patented. The first Laser was brought in to being in 1960 by Theodore Maiman at Hughes Research Laboratories, and were not in a form to be used for cutting metal until around 1965. Note that both of these time frames were significantly AFTER the era of etched axes. Though lasers are used in guiding CNC machines that use metal or carbide bits, cutting lasers may also be used in more advanced set ups. Lasers powerful enough to cut deeply into steel are not readily available to small scale operations, though simple laser engravers are. In most cases, CNC use and cutting laser use leaves similar attributes, so the following information is pertinent for both. Etching a design on an axe using CNC technology is a repetitive motion action. In other words, the router bit (more appropriately called an "End Mill" in CNC machinery, much like a drill bit used to carve out a section of metal) or the cutting laser is passed over the face to be etched a number of times, cutting out a line in the metal. The bit or laser is then passed over the section again, this time directly adjacent to the original cut, widening the cut by two fold. However, due to the nature of both a physical bit and a laser, the cut has some distinct qualities that we may note. The first is that the cut is extremely vertical, and leaves a sharp lip in the top of the cut (See figures I-K). The second is that the trough of the cut is typically slightly concave, leaving a very slightly raised edge along each pass of the bit or laser (See figures I-K). The more expensive a CNC setup, the less this concavity is noticed, but with “at home” and more economical versions, it is highly noticeable.


To check out a short video on CNC technology used on a small scale for metal etching, check out https://www.youtube.com/watch?v=Ta_KiG_5etU . At time stamp 1:20 you’ll see a great example of the patterns left by CNC machines.

3) Comparing traits of both
Now that we have looked at the 3 types of techniques that may be used to leave marks on an axe head, let’s compare their traits. On stamps, the pressure of the stamp itself being pressed into the metal causes the moving of the metal away from the stamp face, but does not remove metal. This occasionally leaves a slight deformity laterally (as noted in the Collins stamp above), and leaves a rounded lip to the mark, as the metal has been pressed downward and taken a bit of the connected metal down into the mark with it. This is typically used on smaller marks and lettering. As another example, here’s a “True Temper” stamp that is on an original 1940s era axe head.

Notice the stamp has “rounded” lips on each letter in the stamp from the pressing of the metal outward and downward. This is most apparent (to me) on the bars along the 2 main “T”s. You can also tell that the metal stamp itself did not contact the axe head uniformly, as the bottom left portion did not make as distinct of an impression, leaving the stamp fainter along the lower left (the “K E L L”). Now let’s look at a CNC cut “True Temper” stamp. Notice the distinct, crips lips on all of the lettering. The bars along the “T”s are uniform with no “swelling” at the ends. The entire image is uniform in depth, with no variance.

For larger markings, let compare an actual etch to CNC’d fakes. In the example below, note the following attributes given to the etch by the acid immersion process:
1) Rounded edges. Not just the lips of each embossed area, but smoothly down the slopes of each depression.
2) Inconsistent edges. Due to imperfections on a microscopic scale, the acid does not leave perfectly straight lines. Some of the divots and inconsistencies are caused by wear and rust, though there is no evidence of a straight “cut” edge.
3) Inconsistent bases within the cavitied areas. Again, inconsistent dissolving of the metal leaves a randomly textured base. Some of this is caused by aging, use, and rusting, however there are no “tool marks” or repetitive/patterned markings.

Now lets look at the same etch on a 100% counterfeited axe cut with a CNC set up:
1) Straight edges. Vertically cut with a sharp edge. Even with sanding to hide the sharp edge, the vertical faces of the depressions are notable.
2) Uniform edges. Due to the use of a cutting device, imperfections are negligible, and the lines are nearly perfectly straight.
3) Consistent and patterned base to the concavities. In this case you can see the lines left by the cutting bit. They conveniently line up with the main cut around the entire etch, showing the standardized nature of CNC work.

Let’s take a closer look at that same axe (this axe was sold by user “Petronea” on eBay on June 14th, despite reports to eBay that it was fraudulent):

The CNC cut nature of this axe is hugely apparent now that you’re aware of the way the machine works as opposed to the acid etching procedure. You can see the same pattern noted on this axe noted on the AK 47 receivers offered by Petronov Armament in the following picture (sourced online at https://www.recoilweb.com/just-like-mom-used-to-make-139813.html ):

Along with the tell tale signs left on counterfeit axes from the manufacturing processes of both true etched axes and their counterfeit, modern replicas, fraudsters are generally lacking in knowledge about historical aspects of axe manufacturing. This leads to putting stamps on axes that simply make no sense historically, and botching counterfeits by putting antiquated etches on modern designed and finished axes. However, I’ll save examples of that for next time! Hopefully this helps everyone who reads it to safeguard themselves against fraudulent axe manufacturing. To those who would suggest that this info only serves to assist in further refining the counterfeiting, please note that you can fake an image, but with the current protocol for CNC, it'd be more cost and time effective to revert to acid etching than to fake CNC axes enough for them to get by a knowledgeable collector. The procedures differ by too far for them to be totally aligned.
Thank you for putting this information together. Sure is a shame